Orthographic Drawings
Take Notes: You can use your hand written notes during the tests
When we talk about orthographic drawings we look at 3 types of views:
1) Front View
2) Right Side View
3) Top View
1) Front View
2) Right Side View
3) Top View
We look at how an object is projected using these views: this is called Orthographic Projection

Why Orthographic Projection?·
Orthographic projection is the most commonly used drafting method because it describes shapes of objects completely and exactly.
Orthographic projection is the most commonly used drafting method because it describes shapes of objects completely and exactly.

|
|
Guidelines To Determining Views to Show·
Draw only those views that are necessary to fully explain the shape.
o There are 1, 2, 3, 4, 5, or 6 view drawings.
o 3 view drawings are the most common with the top, front and right side views of an object.
Draw only those views that are necessary to fully explain the shape.
o There are 1, 2, 3, 4, 5, or 6 view drawings.
o 3 view drawings are the most common with the top, front and right side views of an object.
- The front view is usually the "key view" and gives the most information about its shape. Draw the object so that it will seem balanced.
- Choose views to show the most visible lines and avoid excessive use of "hidden" lines.
The Miter Line and Projection Lines·
The use of a 45° miter line and Projection Lines provide a quick, accurate method of drawing the other views once one view is completed. Sometimes you will need to work on separate views and project lines to each other to fully complete any view.
· Newbie drafters will sometimes try to avoid using the miter line, but as the drawings become more difficult their work will slow down and the accuracy will diminish.
· Once the miter line technique is mastered your speed and accuracy will increase significantly.
· Note: When drawing circles always draw the view with the circle on it first (top view on drawing below) then project the lines to the other views.

Views must lineup!·
The worst mistake you can make in technical drawing is to draw the views out of place. The last 2 drawings would need to be redone or reworked.
The worst mistake you can make in technical drawing is to draw the views out of place. The last 2 drawings would need to be redone or reworked.

Formatting:
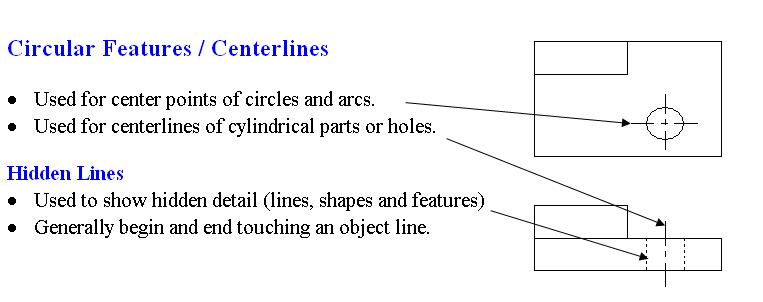
Center Lines are denoted with a pattern of long-short-long-short.
Hidden Lines are denoted with dashes
Center Lines are denoted with a pattern of long-short-long-short.
Hidden Lines are denoted with dashes
Assignment:
Go back to your isometric drawings worksheet and look at the bottom of the worksheet for an example of an orthographic drawing for figure 2.
Go back to your isometric drawings worksheet and look at the bottom of the worksheet for an example of an orthographic drawing for figure 2.
- Draw the front, right side, and top view for the rest of the figures.
- Draw in all hidden lines and centerlines
- If no orthographic paper is available or if working at home click below to print out some Isometric Sketching Paper (print back to back.)
|
| ||||
