Introduction to Photography
By the end of this unit, students will be able to understand photography basics that include: analyzing photography techniques, camera basics, use of equipment, white balance, camera angles and more. Students will then take these photographs and enhance the images through techniques performed through Adobe Photoshop.
Here is an introductory PowerPoint to get you started:
Here is an introductory PowerPoint to get you started:
| introduction_to_photography.pptx |
Getting to Know Your Camera Assignment
I apologize to the folks who know what all the buttons do all of the time on the camera. However, as a starting point there's probably a few buttons on the camera that you do not know yet. This includes the options on the dials! So here is a short assignment that will help you get to know the DSLR better.
In this school, we will be looking at Canon Brand Digital Cameras. Most cameras have features that perform similar functions; the options you will be looking at are not necessarily unique to Canon because you can find most of these settings and buttons on the Nikon, Olympus, Fuji, Casio, Sony, etc brands.
One of the greatest challenges the current generation has is to use unlimited knowledge at your finger tips. While I could have made a lengthy resource for you to study about what all the buttons do I decided to allow you to use the internet to find the information you need. Even though this may take longer, it is an important skill to learn. In this class you will be consulting the internet to answer your questions, so now is a good time to start searching for answers. Finding the correct answers starts with asking the right questions. If you need help with your questions please let me know!
Step #1: Get a camera
- Sign it out properly
- Bring it to your desk
- You will not need to go anywhere
Step #2: Create a table
- Do not literally build a table
- On your website create a table (like the one provided) in your Assignments Page
- Sign it out properly
- Bring it to your desk
- You will not need to go anywhere
Step #2: Create a table
- Do not literally build a table
- On your website create a table (like the one provided) in your Assignments Page
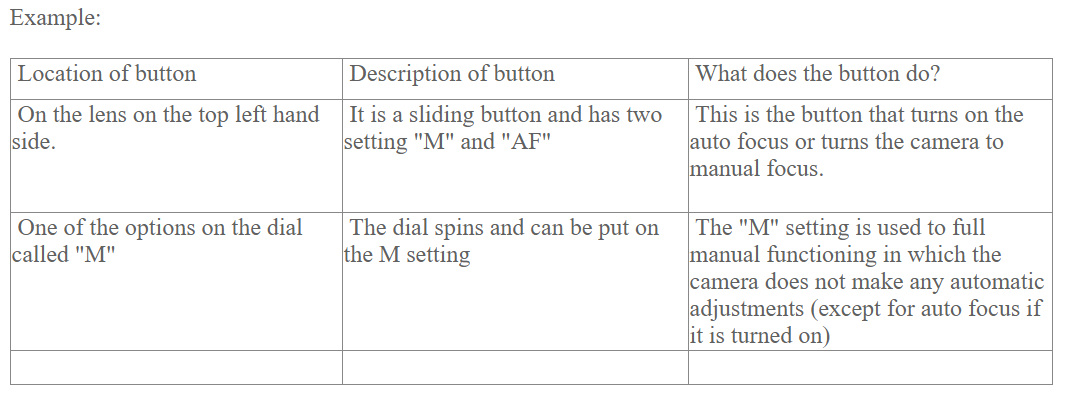
Step #3: Fill in the table
- Go through all the buttons and fill in the table
- Some of the cameras are slightly different and may have a different layout for buttons and number of buttons
***This is a very important step as I have found that by missing this basic knowledge students have a hard time and make mistakes in future lessons. ***
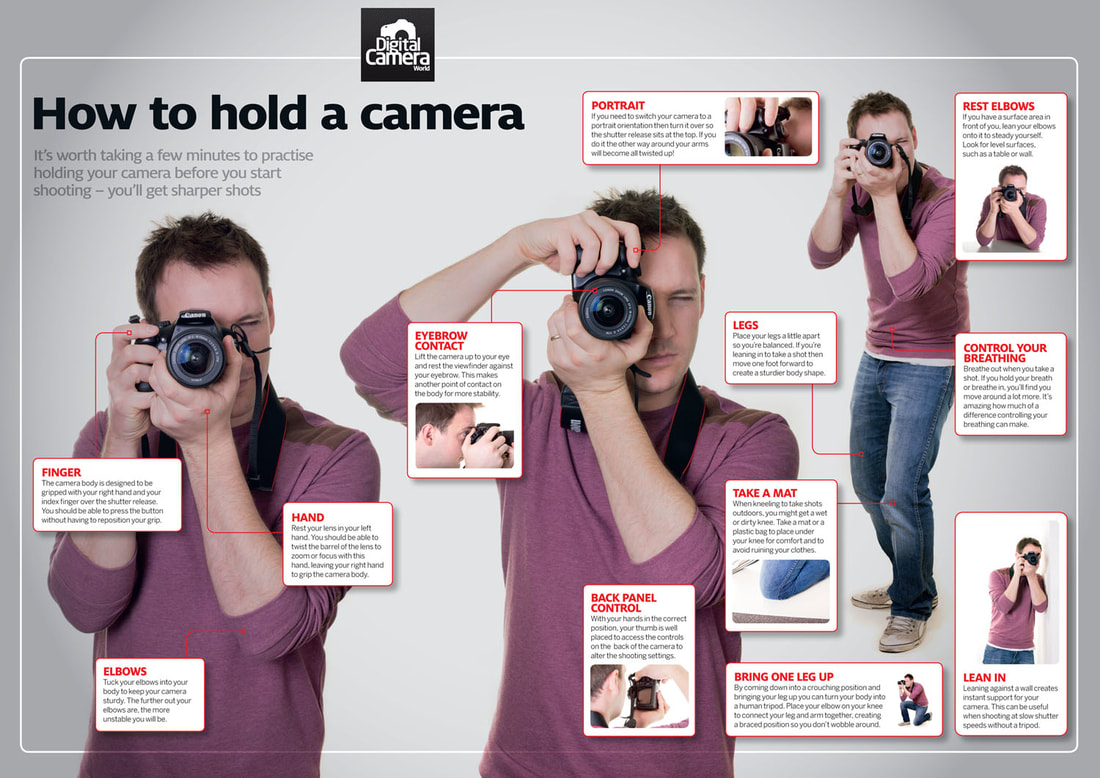
Shot Skills
Since we are using Canon DSLR Cameras, study the following poster on how to hold a camera properly and then watch the 2-minute YouTube video below.
The basics of understanding the different types of shot skills are shown in the PowerPoint below:
| _1__shot_skills_1.pptx |
Assignment:
Step #1
- Look at the PowerPoint Presentation above.
Step #2
- Get a camera (you can use your own or use one from the school)
Step #3
- On your website create a page called Photography. This is where you will put all the work that you have done for this unit.
Step #4
- Go take the following pictures: Extreme Long shot, Long Shot, Medium Shot, Close up, and Extreme close up
- ALL PHOTOS MUST USE LAW OF THIRDS AND MUST BE OF PEOPLE!
-Take many pictures and use your artistic judgement to choose the best one, for each shot. I expect quality, artistic photographs, not just the first one taken.
Step #5
- Create a document in Photoshop, and put your best example of each shot (labelled).
- Title it SHOT SKILLS. Save the document as a PDF and insert it into your photography page.
To give you a sense of further techniques in the following courses, watch the video below to learn about manual settings:
Focus:
Before we venture off trying different types of photography, a REALLY important skill that everyone should know is how to focus the camera on a subject you want to focus on.
What does that mean? As some of you may know, focus is when you hold the shutter halfway and the camera focuses in on a certain subject within your field of view.
What you probably didn't know was the following:
Step 1:When using a Canon DSLR camera, the device will let you know when it is focused by letting out a small beep.
Step 2: When you look through the viewfinder, PAY ATTENTION TO WHERE THE RED DOTS ARE ILLUMINATING. The area where a red dot is illuminated shows you where the camera has chosen to focus onto.
Step 3: After you make sure that the subject you want focused on is illuminated in red, YOU MAY NOW FREELY MOVE YOUR CAMERA so that you can position the subject to follow the rule of thirds. (This means that I can point the camera at my subject right in the center, let the camera focus on it, and while holding the shutter speed still halfway down--move and position my view to follow the rule of thirds afterwards)
